
The Dashboard is the first place you land when logging into your SSL.com account. This document, part of our portal documentation, will acquaint you with the Dashboard and all of its powerful features.
Introduction to the Interface
To access the Dashboard, you must first login to your SSL.com customer account. To sign in, use the Login button on SSL.com’s menubar, located between the Live Chat and Cart buttons.

Upon successful login, you will be redirected to the Dashboard, where you can find out more details about the status of your SSL.com account and all of your orders and certificates.

The Dashboard provides all sorts of information about your account. For an easy overview, you can check the header panel next to the LOGOUT link.


The Dashboard’s interface is divided into further sections, which are explained in detail in the rest of this document.
Manage your SSL.com Account

The Login Account section allows you to manage your SSL.com customer account. More specifically, this section allows you to:
- Edit your account’s email address
- Change your account’s password
- Register your account as a referral link partner
- Upgrade your account to a reseller
- Edit your account’s settings
If you are looking for more details on adding a Team name and URL, please skip ahead to the relevant section.
Edit Email Address

Clicking the edit email address link will redirect your browser to the following form, where you can edit your SSL.com account’s current email address.

After you enter the new email address, and click Submit, you will be redirected back to the Dashboard and shown a message that your account has been updated.

Change Password

The change password link will allow you to change your SSL.com customer account’s login password. Clicking the link will redirect your browser to the following login password edit form.
![]()
Please type your old account password into the Old Password text input field and your new password into New password. (Please take care to follow the password policy shown in the form.)
Then, carefully retype your new password in the New password again field to check for any typos and click Submit. Upon success, you will be shown an “Account Updated” message.
Become a Referral Link Partner

Our affiliate program is free to join and very easy to sign up with. You will be supplied with a range of banners and textual links to SSL.com’s products that you can place on your website. Simply refer your customers to our marketing material or the SSL.com website directly and start earning commissions on each transaction.
To become an SSL.com referral link partner, all you have to do is create your affiliate account. Afterwards, click the become a referral link partner link on the Dashboard to go to the affiliate login page.

Type your account details and click the Login button to visit your affiliate account management page.
For complete information about our affiliate program, please take a look at the program’s page.
Upgrade to Reseller

SSL.com’s reseller program is tailored for customers who need a large number of certificates (and would like significant discounts), such as web hosting providers or domain registrars who wish to offer the security of an SSL/TLS certificate alongside their primary products.
Becoming a reseller will ease the management of bulk SSL certificate purchases, and increase your bottom line through volume discounting. You can find our ongoing discount prices on each reseller tier here.
Any customer account is eligible to upgrade to our reseller program. (If you don’t already have an SSL.com customer account, it is very easy to create one.)
To upgrade your account to reseller, click the upgrade to reseller link to redirect your browser to our reseller profile registration form.

To register a reseller profile, you must follow the steps on this form. First, fill out your profile information and click Next to submit the details and proceed to the next step of selecting a reseller tier. (You may click Cancel to leave the profile registration page at any time).

After you have filled out your information and selected your tier, you may click Finish to finalize the process and perform the account upgrade.
Edit Settings

The settings link will redirect you to another page that will allow you to edit your account’s team and notification settings. For more information, please refer to the settings section.
Manage Billing and Purchases

The Billing and Purchases section allows you to manage your payments and your account’s funds. More specifically, you can:
- View billing records and acquire invoices for your purchases
- Buy a certificate
- Deposit more funds into your SSL.com account
- Add or remove billing profiles
- View your purchased certificates
Billing

The billing link provides an overview of your account’s purchases and allows you to download invoices for any past transaction. Clicking the billing link will redirect your browser to the following page:

To download an invoice, just click the PDF link in the Invoice column. You can also:
Transaction Details
You can find details about a specific order by clicking its link in the Description column.![]()
This link will redirect your browser to a page with the transaction details.
This page contains all the relevant information for the order you selected, including its reference number, the total paid sum, the transaction date, and more. To find your order’s current status in SSL.com’s backend, click the link labeled Click here (under Show Order Transaction) to redirect your browser to the portal’s Certificate Orders page.
![]()
You can also edit the address of the invoice for this specific transaction, or download it as is using the Invoice Detail section. Click the Change Address button to input a new address that will be shown on the invoice. Fill out the form that is shown and click Submit when you are done. If you download the invoice again, it should contain the new address you have just submitted.

The Invoice Details section also allows you to download multiple invoices en masse for periodically repeatable transactions. Click the Download Invoices button to select the date range that you wish to download invoices for.

Finally, you can add searchable tags for the transaction, so that you can quickly identify it. To do so, click the grey box in the Tags section.
![]()
You can type a new tag and hit return (or enter), or remove one by clicking on the x icon in the tag.
Find Transaction
The transactions page provides a powerful search bar that allows you to quickly find any transaction. You can search for a specific order number by typing the number in the search bar and clicking the Search button.

If you want more control over your search results, you may click the Filters button to access the available search filters.

Selecting a filter will allow you to configure its values, and you may combine as many filters as you need. Each filter accepts its values in its own format; for example, checking the Amount filter will allow you to search both for an exact or an approximate amount.


Buy Certificate

The buy certificate link will redirect your browser to our certificate store page. You can buy any certificates from this page. Just select your certificate type and click Buy to add it to your cart. When you are done, you can proceed to check out and purchase your selected certificates.
Deposit Funds

The deposit funds link allows you to transfer funds from any of your registered billing profiles to your SSL.com account. Clicking the deposit funds link will redirect your browser to the Deposit Funds form. (If you don’t have any registered billing profiles, it is discussed in the next section.)

First, you must choose the funding source (or billing profile). If you don’t have one, you may create one using the Add new billing profile button.
Next, specify the funds you would like to transfer to your account and click the Click to Load Funds button. You should see your balance change in a few moments.
Manage Billing Profiles

The manage billing profiles link allows you to add, edit, or remove billing profiles from your account. Clicking it will redirect your browser to the billing profile page.
To add a new billing profile, click the Add new billing profile button, which will present a form where you can type your profile’s information.

When you are done, click Submit to create the new profile. You should then be able to find your profile in the Billing Profiles list above.

View Purchased Certificates

The view purchased certificates link will redirect you to your portal’s Orders page. You can find more information about the Orders page in our portal documentation.
Use Certificate Credits

When you make a certificate purchase, you are given a credit for that certificate. It is not until you take the steps to provide either a CSR or other required information that you receive the certificate and can install. The use certificate credits link will take you to a page showing the certificate credits you have purchased, and which ones require more information. They may say submit CSR or provide info depending on the needs of that particular certificate. By clicking on that link in the action column, you can add the necessary information.

Monthly and Daily Invoices

SSL.com offers an invoicing function to help users easily pay for their invoices. By clicking on the ‘monthly and daily invoices’ link, you’ll be able to view and make payments on your unpaid invoices.
Manage Identities and Contacts

This section allows you to add, modify or remove any contacts and validated identities that are associated with your SSL.com account. These distinct roles are described below:
Contacts

Your account’s contacts are people, such as your administrator or a billing manager, that receive notifications for your issued certificates. To include a contact in a notification group, first you must create one.
To view your account’s contacts, use the contacts link in your Dashboard. Clicking this link will redirect your browser to the contacts page, shown in the following image.

You can use the search form to find a specific contact, or use the list below to locate it. Furthermore, you can opt to add or remove a contact from a notification group using the check boxes. You can click VIEW to see the contact’s details, or click EDIT to edit it.
To create a new contact, click the New button to visit the contact creation form.
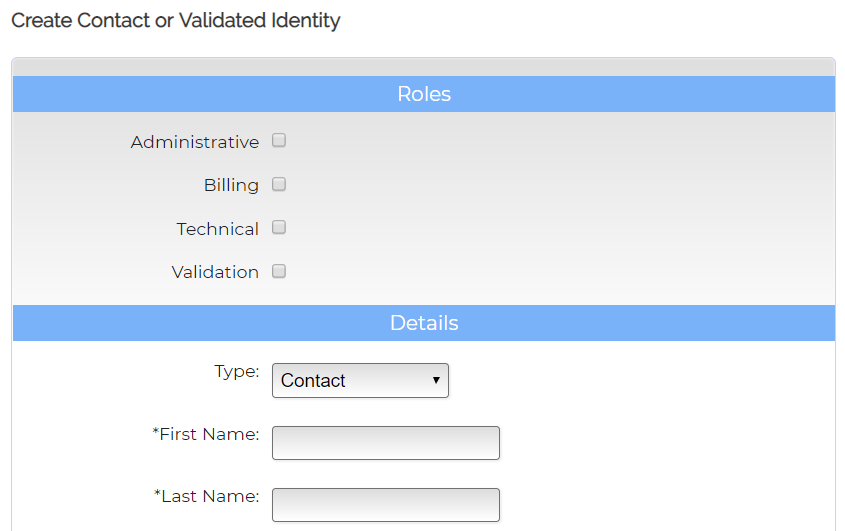
Choose a role (or notification group), making sure to select Contact in the Type drop-down list.

Fill in the rest of the input fields with all requested information, then click Submit to create the new contact.

If you want this contact to be the default contact for your account, please enable the Default check-box before submitting the form. Upon success, you should be able to see the new contact in the contacts page.
Validated Identities

Validated identities are used for the issuance of high-assurance certificates, such as Organization Validated (OV) or Extended Validated (EV) certificates. High-assurance certificates require SSL.com to validate the identity of the prospective purchaser before issuing them a certificate.
To ease this process, the Dashboard allows you to create identities and have us validate them beforehand. Afterwards, you can use those validated identities to issue any high-assurance certificate without any delay. For more information about OV and EV validation requirements, please take a look at this article.
Clicking the validated identities link will redirect your browser to the identities page, where you can access all of the validated identities associated with your account.

You may use the search form or browse the list below it to find a specific identity. In the Actions column, click VIEW to see the identity’s details, and EDIT to update them. Clicking DELETE will permanently delete the identity. (Note: you will have to re-validate deleted identities if you wish to use them again.)
To create a new identity, click the New button, redirecting your browser to the identity creation form.

Please be careful to select the Validated Identity type in the Type drop-down list. Next, select the type of validated identity you want to create. The two options are:
- Individual (the identity of a person)
- Organization (the identity of an entity such as a company or other type of organization)
Keep in mind that each type of identity requires different information for validation. For example, the First Name and Last Name fields of an individual identity become Company Name in an organization identity.

When you have selected the type of the new identity, you may proceed to fill the rest of the form’s fields with the details, and click Submit to create the identity.

Edit SSL.com Account Settings

Clicking the settings link in the login account section of the Dashboard will redirect your browser to the settings page, where (naturally enough) you can configure your account’s settings. More specifically, you can:
- Add a team name and URL
- Edit your account’s notification settings
- Manage your account’s certificate expiration reminders

Add Team Name and URL

Each new SSL.com account comes with its own Team. To learn about what Teams are and how they work, please visit the Teams page of our portal documentation.
By default your Team has an auto-generated name and URL, which you can change in the settings page. Since you may have more than one Team, selecting easy-to-remember names and URL slugs for each one will save you time and effort.
Before moving forward, please make sure you have set the Team you want to work with as the current Team in the header panel.
To change your Team’s name, click the ADD TEAM NAME link in the Team Name and URL section of the settings page.

Your browser will then be redirected to a form where you can update the Team’s name.

Type your desired Team name in the text field and click Submit to finalize the change. You will be greeted with a success message banner, and you should be able to see the new Team’s name in the header panel.

To generate a new Team URL, locate and click the ADD TEAM URL link in the Team Name and URL section.

Upon clicking this link, your browser will be redirected to another page with a form that allows you to input a new team URL.

Please note that the Team URL may only contain letters (a-z ), numerals (0-9), underscores (_ ) and dashes (- ). The form itself will validate your candidate URLs in real time and inform you whether they are valid or not.

When you are satisfied with the URL, click Submit to create it. (You will be informed of the change’s status with an alert banner.)


Edit Notification Settings

This menu allows you to decide which people on your Team get notified whenever a certificate’s status is updated or a new order has been submitted. You can opt to notify your Team’s administrative or technical contacts (if provided), and even include any other email addresses that might serve your administrative needs.
Please note that to include more than one address in the include address(es) text field, you must separate them with a space ( ).
Manage Expiration Reminders
Each SSL Certificate comes with an expiration date. As that date approaches, SSL.com sends out email reminders of the pending expiration of the certificate to a designated email address. Email addresses for specific SSL certificates can also be set, and these take priority over other addresses.
Expiration reminders are enabled by default, however you can completely disable them at any time by deselecting the Disable/Enable Email Reminders check-box.

In the Expiration Reminders form, you can specify triggers for up to five reminder notices. A notice will be sent the specified number of days prior to the expiration for each trigger. For instance, if you set a trigger for 30 days prior to expiration, then on the 30th day before expiration for your SSL certificate(s), a reminder notice will be sent to the designated email address.
As with notification settings, you can select to include your certificate’s administrative and technical contacts, and additionally include any email address that might be useful for you.
When you have finished editing your account’s settings, click Submit to save the changes.
Developers and Integration Tools

This section contains links to SSL.com’s developer tools. SSL.com has implemented the powerful SSL Web Services Application Programming Interface (or SSL.com SWS API), which allows you to use SSL.com’s online services in your applications.
Moreover, to facilitate testing and debugging of such applications, SSL.com maintains a sandbox testing instance which is a clone of our production release of the SSL.com portal and SWS API. You can experiment with our services freely in the testing instance, as this is a test environment for API orders. Orders and transactions in the Sandbox are not live, and by extension not billable.
To get started with our developer tools, visit your Dashboard and locate the API section to:
- Manage your account’s SWS API credentials
- Access our Sandbox Testing instance
- View the SWS API documentation
Generate API Commands

SSL.com’s RESTful SWS API simplifies automation of certificate issuance and lifecycle. To make things even simpler, you can retrieve preformatted API strings from your SSL.com account portal, allowing you to easily access a variety of API calls from your command line and/or scripts. The generate api commands link will direct you to a page with preformatted strings for your use. Keep in mind you’ll have to manually add your account key and secret key to do so.
API Credentials

SSL.com’s SSL Web Services Application Programming Interface (or SSL.com SWS API) is a programmable interface that lets any application with the appropriate credentials access and perform any of our on-line services (e.g. issue or revoke certificates, validate identities, and so on). Before using our API, you must create the aforementioned credentials. Clicking the api credentials link on the Dashboard will redirect your browser to the credentials management page.

On this page you can view all of your created API credentials, along with their Account Key and Secret Key values, which you will need for your applications. The Account Key points to this specific credential, while the Secret Key is the actual authorization key to access the API. You cannot change your account key; however you can reset your secret key for any of your credentials as you please.
Furthermore, each credential is assigned one or more Roles, which inform our back-end to allow or deny access to certain API actions.
The available roles are shown in the following list:
account_adminallows users with this role to manage every detail in the account, similar to being an owner.billingallows users to manage invoices and billing information for the Team.individual_certificateprovides access to a single certificate order. The user cannot access anything else on the Team.installerallows users to create certificate orders, perform validation, and download issued certificates, though they cannot access anything else on the Team.users_managerallows users to manage other users’ access.validationsallows users to manage the Team’s pending validations.
To edit a specific credential, locate it in the list and click on the edit link in the Actions column.

This will open a credential editing form.

This form allows you to view and manage your credential’s keys and roles. To view the Secret Key, click the Click to view button.

If you want to change your Secret Key, you can use the Reset Secret Key button. For security reasons, our portal does not allow you to type in custom keys, but rather it generates one for you. Clicking the Reset Secret Key button will instruct our backend to discard the old key and generate a new one for you.

Finally, this form allows you to assign or remove roles from a credential entry. To enable a role, first locate it in the Role(s) check-box list and enable the check-box next to it. To disable a role, make sure that its check-box is disabled. For example, the credential in the image below only has the role of account_admin assigned.

When you are done editing your credential, click Submit to finalize the changes.
To create a new credential, click the Add Credential button, above the credentials list.

Upon clicking this button, your browser will be redirected to a credential creation form. The form is the same as the credential editing form, and you can refer to the credential editing instructions above for more details.
Developer Tools

Currently, SSL.com’s developer tools consist of the Sandbox testing instance. The Sandbox is an up-to-date clone of the production release of the SSL.com portal and SWS API. The Sandbox however, allows you to freely experiment with its services, as this is only a test environment for automatic certificate orders. Orders and transactions in the Sandbox are not live, and by extension not billable.
Clicking on the developer tools link will redirect your browser to the Sandbox. To access the Sandbox, please click the sign-up link in the log-in form and proceed to create a new Sandbox account. For more details on the account registration process, please read this article.
View Documentation

SSL.com provides a complete API reference for the SWS API. You can click view documentation in the Dashboard to access the SWS API documentation.